

Men's Textured Cut
Textured haircuts aren’t just for ladies—men also need movement in their styles. To drop knowledge on where and when to add texture, we had ARC™ Scissors Hair Architect Matty Conrad (@mattyconrad) take the stage at ISSE in Long Beach, Calif. to teach this cool-guy cut. Scroll down for the step-by-step and some takeaway tips to use behind the chair.
Scissors Used: PARAGON II
 ARC™ PARAGON II
1. Prep by wetting the hair down completely. Section with a horizontal parting, depending on the desired shape of the haircut. Matty shared these tips to determine where to place it:

2. Starting in the back take a vertical section with a slight graduation—slightly longer than finger length to establish a guideline.

Pro Tip: “Always cut your guide longer than desired,” explains Matty. Why? “It leaves enough hair to create texture, but avoids a haircut that is too short.”
3. When working towards the sides, start to pivot the sections to a diagonal forward parting above the ear. Why? “You always want to cut in the direction you want the hair to fall,” Matty explains. “By adjusting the direction of the section, the hair will automatically start to fall forward.”

Pro Tip: For complete control when cutting, Matty needs a scissor that allows him to control of his thumb and stabilize his blade. For this cut, Matty uses the PARAGON II from ARC™ Scissors. “The design is so ingenious,” says Matty, “the handles give me complete control, resulting in clean, precise lines with my haircuts.”
4. Repeat on the opposite side, cross checking for balance.

Pro Tip: Once sections start to become more horizontal, lower your elevation to preserve graduation.
5. Using square elevation and vertical sections, cut the center back section to preserve any weight at the nape. This works especially well for clients with thinning hair.

6. To blend the weight line, take a center parting beginning at the crown and ending at the occipital bone. Overdirect the hair straight out to the side to preserve length at the crown and cut a clean line.

7. At the crown, use the previously cut section as a guide and take linear sections going forward, cutting the hair blunt at the ends.

8. To texturize, prep the hair with Victory Barber & Brand PRIMER and dry the hair completely. Slide cut the bottom and sides using the SYMMETRY 10/10 Reversible Texturizer from ARC™ Scissors, with the straight blade pointed down. “When texturizing, I need control over not just the hair that is being removed, but also styling and the finished look,” Matty explains, “so, I texturize with the SYMMETRY 10/10.”

Scissors Used: SYMMETRY 10/10 REVERSIBLE TEXTURIZER
 ARC™ NEW! SYMMETRY 10/10 REVERSIBLE TEXTURIZER
9. To texturize the top, Matty goes back to his PARAGON II to point cut. Why? “I want this look to have a lot of separation and point cutting with a straight blade helps me control the amount of hair that I am taking out.” Use a steep angle when point cutting, closing the scissors as you exit the hair. To clean up the texture, slide cut any pieces that look bulky.

Pro Tip: To create maximum texture when point cutting, take sections across the flow of the hair. This will help give stronger separation to your point cuts.
10. Clean up the outline with a shallow point cut around the perimeter of the hairline.

11. Style using Victory Barber & Brand SUPER-DRY. Working the product roughly through the hair to create texture and a matte finish.

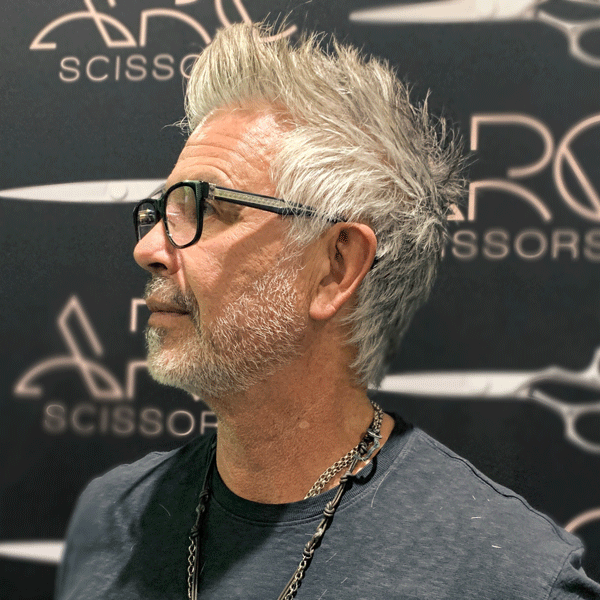
12. Finished Look

Ready to try this haircut behind the chair? Click here to purchase the PARAGON II from ARC™
Comments on this post (0)