Volume Guaranteed: Try This Layering Technique For Fine Hair

3 Tips For Perfecting Face-Framing Layers On Fine Hair
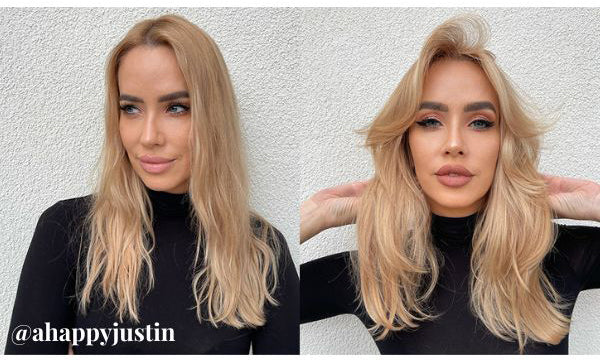
If you’ve struggled with achieving this year’s trendy, layered looks on your finer-haired clientele, we hear you. That’s why we tapped ARC™ Scissors Artistic Team Member Justin Toves-Vincilione (@ahappyjustin) for his foolproof layering technique for fine hair types…And it only takes 15 minutes! (Shags and butterfly cuts, we’re coming in hot.)
Keep scrolling for tips on using sectioning, overdirection, elevation and precise cutting to recreate Justin’s volume-boosting layers in record time.
Check out Justin’s before and after:

1. Preserve all-over length with this simple sectioning tip.
Justin’s key to preserving length while adding layers is simple: Leave the back of the hair one length. That might sound like the opposite of what layers are trying to do, but hear us out: While the all-over length in the back serves as a backdrop for the front layers, the crown will add movement to the back once the look is complete. How? It lays the foundation for concave layering later on.
Here’s how Justin sets up his zigzag crown parting:
- Section your client from the center part to the back of the ear, dividing the front and back sections.
- Section out the crown with a zigzag part. Secure with a pin for later. This is crucial for adding movement to the back section later on without reducing length and density.
- Fully service the back section, excluding the crown.
Pro Tip: Whenever you’re working with finer-haired clients, it’s important to keep the hair moisturized and saturated with water. If you catch the hair drying out, add water as you work.

2. Don’t be afraid to take off too much hair when cutting layers.
The number one mistake that stylists make when creating layers on fine-haired clients is not taking away enough length. (Yes, we know that sounds surprising, but trust the process!) Without taking away some length, your hard-earned layers won’t have the volume and bounce your client is looking for.
Pro Tip: Justin uses ARC™ Scissors PARAGON II which features razor-sharp blades, specifically meant for cutting blunt lines—which are ESSENTIAL for creating any kind of layers on fine hair.
Here’s how Justin preserves the perfect amount of length when cutting his face-framing layers:
1. Working with the front of the hair, take a triangular section right off the center part. This will be your guide.

2. Hold the guide straight out from the face with high tension and use ARC™ Scissors PARAGON II to trim it at the tip of the nose. You’ll know if your guide is correct if it falls just above the cheekbone.

3. Then, split your freshly cut guide into two even parts. Combine one part with a new section from the same side at a diagonal forward.

4. Hold the combined guide and new section out at 90 degrees, then cut a blunt line directly at the guide. The result: A layer that dips just a little deeper past the cheekbone, elongating with subsequent layers.


5. Continue until you move on from the initial center part. Then, take vertical sections to move with the natural fall of the hair. Remember, overdirection is your friend here!
3. Use concave layering to add movement through the back of the head.
Once both of the front sections are layered, move on to the crown. The goal: To add movement over the back’s one-length haircut through a concave layering technique where the hair is cut to curl inwards towards the head. (We’ll give you a hint: Overdirection does all of the work for you.)
Here’s Justin’s concave layering technique:
- Detangle the crown section and split it into two even parts: Top and bottom.
- Pull the top section all the way forward. Instead of cutting this section according to your original guide, you’re going to cut it along with the guide below the parietal ridge.
- Cut along the parietal guide, adding hair from the crown as you go; you should notice less hair being taken off as you work towards the last section, showcasing the length you’ve preserved.
Pro Tip: The higher you hold the hair, the more layering you’re going to create. The lower you hold the section, the more length you are going to preserve.

Why the ARC™ Scissors PARAGON II?
- Designed for smooth, razor-sharp cutting performance on dry and wet hair
- Always 100% handmade in Japan with Master level Super Gold steel
- Expertly honed by Japanese scissor craftsmen using an advanced tempering process to increase performance and edge life
- Ergonomic, balanced handle for extreme comfort
- No snagging or pulling with flush-mounted tension adjuster
- Optimized for precision line work and slide, slice and point cutting techniques
To watch Justin's FULL 45-minute fine layering technique with fast blow-dry styling, click here!


Comments on this post (0)