
VIDEO HOW-TO: TEXTURED BOB HAIRCUT
Watch: Textured Bob Haircut How-To
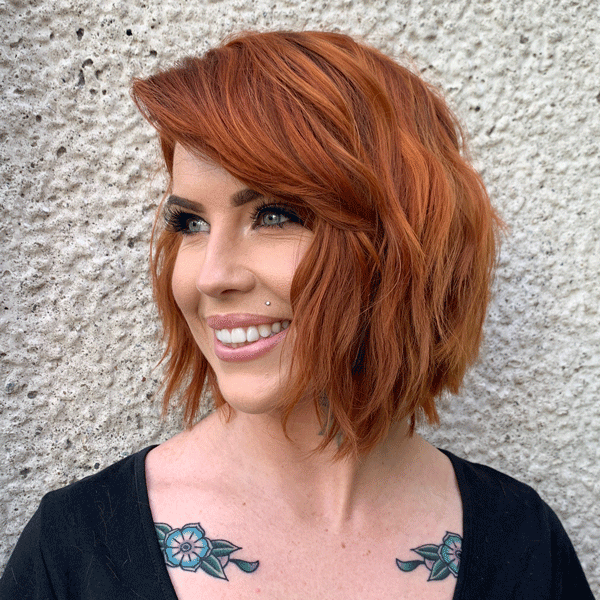
If there is one thing we really love, it’s a makeover. So when ARC™ Scissors Hair Architect and BTC Team Member Buddy Porter (@buddywporter) told us he was was transforming super long locks into an on-trend textured bob onstage at ISSE in Long Beach, Cali., not only did we go live on BTC's Facebook page, but we just HAD to share the how-to steps! Scroll down for a full breakdown of this major chop.
Watch The Video How-To Below
Scissors Used:
 ARC™ PARAGON II
1. Prep the hair with Virtue® Healing Oil, then use a round brush to blow-dry the hair smooth.
2. Using the client’s head shape as a guide, create simple, clean sections:
- A middle parting from the front hairline to the top of the crown.
- A diagonal forward parting from the top of the crown to behind each ear.
- Since Buddy’s model had SO MUCH hair, he created a second diagonal forward parting to divide the back section in half.
3. Then, to create a perimeter that is diffused and has movement, cut square sections with a deep, angled point cut. Be sure to keep the hair at a natural fall with a small amount of elevation toward you.
Pro Tip: For this cut, Buddy used the PARAGON II from ARC™ Scissors, which are specifically made for cutting dry hair. “I’m a dry cutter for a majority of my cuts,” Buddy explains. “So I need a scissor that can keep up with my day. The PARAGON II is made with a higher quality steel, which makes them sharper, and they cut through dry hair like butter.”
Click here to get your pair of PARAGON II from ARC™ Scissors!
4. Before dropping down more sections, create shape and movement with block graduation. Here’s how:
- Take a 1- to 2-inch section and overdirect it 180 degrees straight up from the head. This will allow the baseline to fall out of the section and maintain a strong perimeter.
- Use a very deep point cut or knotching technique to create layers. These layers will be disconnected from the layers that will sit on top, giving the cut internal movement.
Pro Tip: When dry cutting layers, it’s important to avoid bending or pulling on the hair. That’s why Buddy always uses the PARAGON II from ARC™ Scissors. They stay sharper longer and hold their edge, meaning they cut through dry hair easily without disrupting the cuticle or damaging the ends.
5. Drop down the top and front sections, overdirect them back to the guide, then point cut to connect them to the baseline.
6. For the top layers, take radial sections starting at the crown. Overdirect the section straight up from the head and cut the corner within the section to create the layer. Be sure to not take the sections too deep or this will weaken the perimeter.
7. If the haircut is still looking heavy, use a micro knotching technique to texturize even more:
- Take a horizontal section and find the bend of the hair. “Take your section and bend the hair back,” Buddy explains. “I don’t want to cut past the bend because then the hair may stick straight out instead of blending with the baseline.”
- Comb the section smooth and take small micro cuts all the way down to texturize. “It’s my way of texturizing without switching shears and also having complete control of where I place the texture,” Buddy explains.
8. Once you’re happy with the shape of the cut, clean up the perimeter and use slide cutting to create additional movement.
9. Curl with a 1 ¼-inch Marcel iron and finish with Virtue® Texturizing Spray.
Slide For This Total Transformation!
Comments on this post (0)